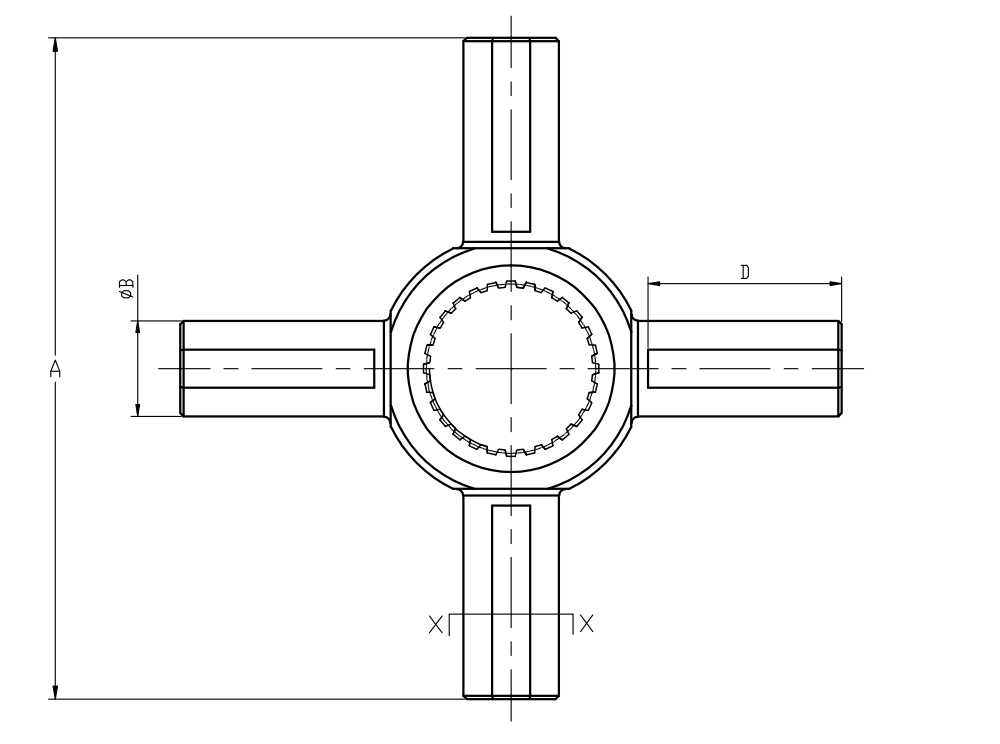
未分类

Maintenance of the counter of the foot-operated sealing machine

Comprehensive Maintenance Guide for Counters on Pedal-Type Sealing Machines

Counters on pedal-type sealing machines play a critical role in tracking production output, monitoring operational efficiency, and scheduling maintenance intervals. Over time, these components may experience wear, electrical issues, or calibration errors, leading to inaccurate readings or malfunctions. This guide provides practical steps to maintain and troubleshoot counters, ensuring they remain reliable throughout the machine’s lifespan.

Understanding Common Counter Issues

Counters can develop problems due to mechanical stress, environmental factors, or improper usage. Identifying early signs of trouble helps prevent costly repairs or production delays.

Recognizing Inaccurate Readings

A counter may display incorrect numbers if its sensor or trigger mechanism fails. For example, if the pedal or sealing arm doesn’t fully activate the counter, the displayed count will lag behind actual operations. Dust or debris blocking the sensor’s line of sight can also cause misreads. Regularly inspect the sensor area for obstructions and clean it with compressed air or a soft brush.

Addressing Electrical Connection Problems

Counters rely on stable electrical connections to function correctly. Loose wires, corroded terminals, or voltage fluctuations can disrupt signal transmission, leading to erratic behavior. Check the wiring harness for frayed insulation or exposed conductors, especially near the counter module. Use a multimeter to verify consistent voltage supply to the counter during operation.

Preventing Mechanical Wear

The counter’s trigger mechanism, often linked to the pedal or sealing arm, may wear out over time. This can result in missed counts or double-counting. Inspect the trigger lever for signs of bending or excessive play. Lubricate the pivot points with a light machine oil to reduce friction and ensure smooth movement.

Routine Cleaning and Inspection Procedures

Regular maintenance prevents minor issues from escalating into major failures. Incorporate these steps into your weekly or monthly schedule.

Cleaning the Counter Sensor and Housing

Dust, adhesive residues, or packaging material fragments can accumulate around the counter sensor, interfering with its accuracy. Use a can of compressed air to blow out debris from the sensor housing. For stubborn grime, dampen a lint-free cloth with isopropyl alcohol and gently wipe the sensor lens. Avoid using abrasive materials that could scratch the surface.

Inspecting Wiring and Connections

Electrical connections are vulnerable to vibration and environmental damage. Examine the counter’s wiring harness for signs of wear, such as cracked insulation or loose plugs. Tighten any loose terminals and secure the harness away from moving parts to prevent chafing. If the counter uses a removable module, check its socket for corrosion and clean it with electrical contact cleaner.

Verifying Counter Calibration

Counters may drift out of calibration due to mechanical shocks or software glitches. To test calibration, run the machine through a known number of cycles (e.g., 50 seals) and compare the counter’s reading to the actual count. If discrepancies exceed 2%, recalibrate the counter according to the manufacturer’s instructions. This often involves accessing a hidden menu or using a calibration tool.

Troubleshooting Advanced Counter Problems

When basic maintenance doesn’t resolve issues, deeper diagnostics are needed. These steps help isolate and fix complex counter malfunctions.

Resetting the Counter Module

Persistent errors or frozen displays may indicate a software glitch. Locate the counter’s reset button or power cycle the entire machine to clear temporary faults. If the counter has a digital interface, navigate to its settings menu and look for a “reset to factory defaults” option. Document any custom settings before resetting to avoid losing critical configurations.

Replacing Worn Trigger Components

If the counter consistently misses counts despite clean sensors and stable power, the trigger mechanism may need replacement. Disassemble the pedal or sealing arm assembly to access the trigger lever and microswitch. Inspect these parts for cracks, excessive wear, or misalignment. Replace any damaged components with compatible alternatives, ensuring proper tension and alignment during reinstallation.

Upgrading Counter Firmware or Software

Some modern counters use firmware that can be updated to fix bugs or improve functionality. Check the manufacturer’s website for firmware updates compatible with your machine’s model. Follow the provided instructions carefully, as improper updates can render the counter inoperable. Backup any stored data before proceeding, and test the counter thoroughly after the update.

By following these maintenance practices, operators can ensure their pedal-type sealing machine’s counter remains accurate and reliable. Proactive care reduces downtime, minimizes waste from miscounted products, and extends the overall lifespan of the equipment.

Discover gayanaga's GAYANAGA HARDWARE SDN BHD, offering high-quality stainless steel kitchen equipment in kota kinabalu, Sabah, including cold rooms, refrigerators, chillers, and freezers for commercial kitchens.Official website address:https://gayanaga.com/

Related Articles

发表回复

您的邮箱地址不会被公开。 必填项已用 * 标注

Back to top button